Tiler: Grid Tiling for Cinnamon
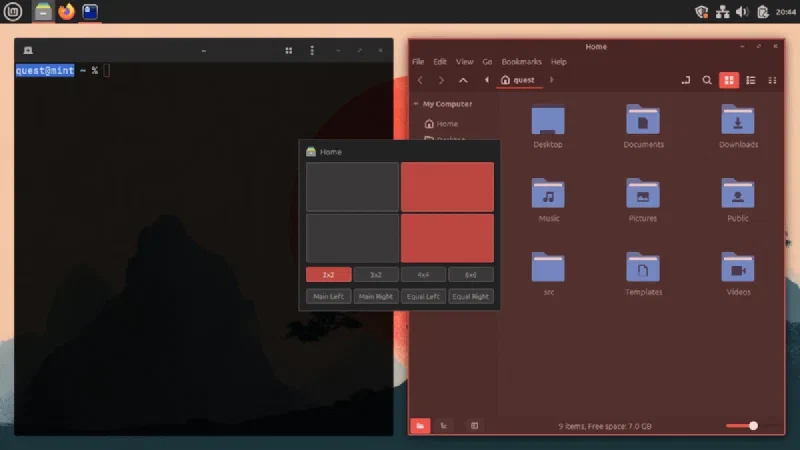
Tiler is here: a grid-based window tiling extension for Cinnamon, built for anyone who wants flexible tiling without switching to a tiling window manager. It brings grid placement on a hotkey, multiple grids, gaps between windows, reserved screen space for docks and Conky setups, and one-press auto-tiling for the whole workspace, all working with the mouse or entirely from the keyboard. I wrote it from scratch, inspired by gTile, because the existing solutions never suited my needs.
Why Not Fork gTile?⌗
I have tried gTile multiple times over the years, and every attempt ended the same way: uninstalled. I wanted gaps between my tiled windows. I wanted tiling that respected my dock instead of covering it. Recently I gave it another shot, hit the same walls, and this time decided to do something about it.
The obvious move was to fork gTile and add the features I wanted. I went in intending exactly that, and the codebase talked me out of it.
gTile ships a compiled JavaScript bundle built from TypeScript source. When I compared the two, the bundle had been hand-edited in late 2025: label styling tweaks, a fix for a hotkey bug after monitors wake. The TypeScript source it was supposedly built from was last touched in 2023. Rebuild from source and those shipped fixes silently vanish. On top of that, it leaks signal connections when the extension is disabled, and it leans on APIs Cinnamon has deprecated: Tweener, global.screen, St.Table.
None of this is a knock on gTile. It has tiled windows for Cinnamon users for years, and it is the reason I knew exactly what I wanted from a tiler. But untangling drifted sources and deprecated APIs is harder than starting clean. So Tiler shares no code with gTile, and credits it openly as the inspiration.
One more deliberate choice: no animations. gTile animates its overlay; I never liked it. Tiler draws instantly and gets out of the way.
How Does It Work?⌗
Press Super+T (changeable in settings) and a grid overlay opens over the active monitor, with cells drawn proportionally so the grid is shaped like your screen. The header shows the focused window’s icon and title, so you always know which window you are about to move. Click a cell to tile the window there, or click and drag to span several cells. As you aim, a full-size live preview on the actual screen updates with every move, and the window lands exactly where the preview showed.
The mouse is optional. Arrows move the selection, Shift+Arrow grows it, the keys 1 through 4 switch grids, Enter or Space confirms, and Escape cancels. Clicking anywhere outside the overlay also cancels, so a stray hotkey press never costs you anything.
There are no hardcoded colors: the overlay reads surface, text, and selection colors from your active GTK theme every time it opens, so it looks native on any theme, light or dark.
By default the overlay opens centered on the screen, with a setting to center it on the focused window instead. Tiler tiles normal windows out of the box, and dialogs and toolbox windows can opt in through settings.
Grids, Gaps, and Reserved Space⌗
Tiler comes with four grids, switchable from the overlay with the number keys or their chips. The defaults are 2x2, a “1,2,1 x 1,1” layout, 4x4, and 6x6, and the last grid you used is remembered for next time.
That “1,2,1” notation is the fun part. A grid in Tiler is not just a cell count. It is a list of track spans per axis. “1,2,1 x 1,1” means three columns with the middle one twice as wide as its neighbors, split into two equal rows. Spans can be floats, with up to 16 tracks per axis. Settings offer simple spinbuttons for plain NxM grids and an advanced field for custom layouts, and each grid can have its own display name and tooltip.
Gaps come in two kinds: the window gap between tiles and the edge gap along screen borders, each 0 to 100 pixels, both defaulting to zero, so tiling stays flush until you say otherwise. Gaps are always uniform - horizontal and vertical gutters match - and they self-limit to a quarter of an axis, so extreme settings on a small screen cannot crush your windows.
Reserved space is the feature my dock has been waiting for. Tiler holds back top, bottom, left, and right margins from every placement, up to 500 pixels each, scoped to all monitors or just the primary. Docks and Conky setups that do not set struts (the hints that keep maximized windows away) finally stay visible. A 250 pixel floor rounds it out: if reservations leave less than that in either direction, Tiler declines to open rather than tile windows into a sliver.
One-Press Auto-Tiling⌗
Sometimes you do not want to place windows one at a time. You want the whole workspace dealt with. From the overlay, one press arranges every eligible window at once, gaps and reserved space included.
There are four modes. Main Left and Main Right put the focused window at full height on one side, with the remaining windows in an even stack beside it. Equal Left and Equal Right split everything into two equal columns, led from either side; with an odd count, the leader gets a double-height cell. They live on L, R, Shift+L, and Shift+R, plus chips on the overlay.
The focused window always leads the layout, and the rest follow in most-recently-used order, so the arrangement matches how you were actually working. If you never auto-tile, a switch hides the feature entirely.
How It Is Built⌗
Tiler is written entirely in TypeScript, compiled with the native TypeScript 7 compiler and bundled by esbuild into the single tiler.js file that ships. Type-checking gates the build: npm run build refuses to produce a bundle that does not type-check. The generated file carries a do-not-edit banner, a direct lesson from gTile’s drifted bundle.
The modules are layered strictly enough that the architecture is checkable by import. geometry.ts, workarea.ts, preset.ts, and autotile.ts are pure functions. winops.ts owns every call into the window manager. overlay.ts owns every actor on screen. And app.ts orchestrates everything while importing no GObject libraries at all. If a pure module ever grows a GObject import, the layering is broken, and you can see it in the import list.
Muffin, Cinnamon’s window manager, taught me things the documentation did not. allows_resize() answers for the window’s current state, so it is false for every maximized window, which silently made maximized windows untileable until I switched to the resizeable property. Work areas come from get_work_area_for_monitor(), which is strut-aware and matches what maximize fills.
Settings get defensive treatment too. Every value crossing from GSettings into the engine passes through validating coercions, so a hand-edited or corrupted settings file cannot make Tiler throw - and that matters, because a crashing extension can take the whole desktop session with it.
Even the keybindings legend on the settings page has an engineering story: it is a custom Python Gtk.Grid widget, because label-based alignment breaks differently in every language, and a real grid does not. Nine translations shipped at launch; none of them can wreck the layout.
Testing the Geometry⌗
Tiler has 90 tests, run by Node’s built-in test runner reading the TypeScript directly. No test framework, no runtime dependencies.
The interesting ones are not the examples. They are the property sweeps: three of them, throwing more than twenty thousand generated grids, gaps, and areas at the geometry and checking laws. Every cell stays inside its area. Neighbors never overlap. Every gap on an axis is the same gap. Requested gaps survive whenever there is room. Edge insets are uniform. And the center of every drawn cell hit-tests back to itself - the pointer math uses the same track sizes the cells are drawn with, so drawn geometry and hit geometry cannot disagree.
Here is the bug that motivated all of that. With exactly two windows auto-tiled, the gaps vanished. A one-track axis needs no gap for itself, so it reported zero, and the uniformity rule - every gap must match - dragged the other axis down to zero with it. Every example test I had written happened to use grids with two of everything, so the bug sailed through to late manual testing. The fix was to let single-track axes abstain from the vote. Then I proved the property harness would have caught it. I reintroduced the bug, ran the sweeps, and the survival law failed immediately.
Built with Claude⌗
Tiler was built with Claude’s help, and the submission to Cinnamon Spices discloses that up front. It was a collaboration, not a prompt. I broke the project into small phases, and no phase moved forward until I had read it and edited what needed editing. Some of the code Claude wrote and I refined; some I wrote myself. There is no AI slop here: nothing shipped that I had not worked through by hand.
Before submitting, I reviewed the finished extension against the repository’s contribution guidelines, the same way I would review any collaborator’s work. The strict layering, the 90 tests, and the property sweeps exist for exactly this reason: so I can stand behind every line, no matter how it was written.
And a genuine thank you to Claude, who handled a pile of extension boilerplate I was happy to skip and did a great job on code reviews along the way. Fair is fair: I reviewed Claude’s code, and Claude reviewed mine.
Getting Tiler⌗
Tiler is PR #1116 at cinnamon-spices-extensions, awaiting review. It needs Cinnamon 6.0 or newer; for Linux Mint that means 21.3 or later. Once it merges, installation is the normal Spices routine: System Settings → Extensions → Download tab, search for “Tiler”, install, enable. Updates arrive through the same place. For most users, that is the whole story.
Before It Lands⌗
If you want it today, the manual install is small. The Spices installer does exactly two things: copy the extension’s files into place and compile its translations. A checkout of my branch and Cinnamon’s own translation tool cover both:
# from the repository root
cp -r tiler@zquestz/files/tiler@zquestz ~/.local/share/cinnamon/extensions/

# compile and install translations (skip on an English desktop)
cinnamon-xlet-makepot -i tiler@zquestz
Then enable it in System Settings → Extensions. Because this lands in the same paths the store uses, a later store install simply takes over cleanly.
Hacking on It⌗
The repository includes a test-spice helper that installs a clearly marked test copy alongside any real one:
./test-spice tiler@zquestz   # validates, then installs as "(devtest) Tiler"
./test-spice -r              # removes all devtest copies when done
The test copy gets its own UUID, its own settings, and a “(devtest)” prefix in Extensions, so it cannot be confused with a store install. Just do not enable both at once; they would fight over the same hotkey.
To work on Tiler itself: npm install once, then npm run build (type-checks, then bundles) and npm test (the 90 tests from earlier). Reinstall with test-spice after each build to try changes live.
Conclusion⌗
I set out wanting two things gTile could not give me: gaps between my windows and a dock that stays visible. What I ended up with is the tiler I kept trying to install all those years; it just did not exist yet.
This is just the beginning, though. I plan on supporting Tiler, and I am open to extending it beyond my own needs: if there are tiling features you have always wanted on Cinnamon, open an issue or a pull request over at my fork of the cinnamon-spices-extensions repo. Give it a try and let me know what you think.